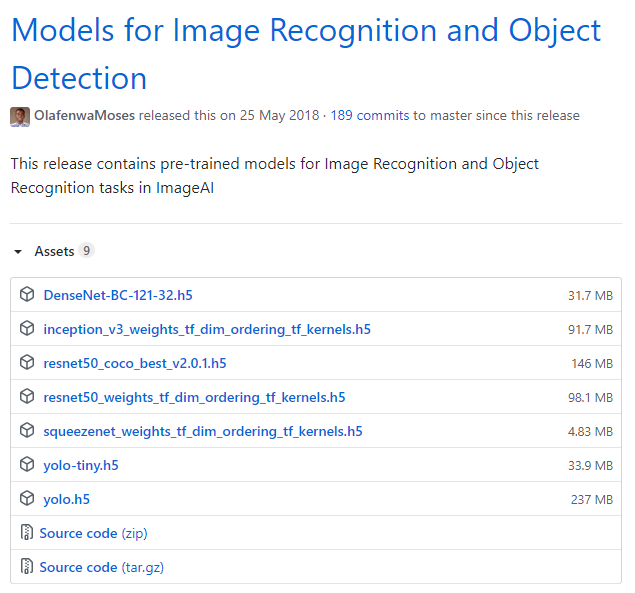
ImageAI는 매우 강력하면서도 사용하기 쉬운 클래스를 제공하여 SqueezeNet, ResNet, InceptionV3 및 DenseNet과 같은 최첨단 딥 러닝 알고리즘을 5 줄의 코드를 사용하여 사용자 정의 모델을 생성하는 자체 이미지 데이터 세트에서 학습합니다. 고유 한 사용자 지정 모델을 학습 한 후에는 ImageAI에서 제공하는 CustomImagePrediction 클래스를 사용하여 고유 한 모델을 사용하여 이미지 또는 이미지 집합을 인식 / 예측할 수 있습니다.


======= imageai.Prediction.Custom.ModelTraining =======

ModelTraining 클래스를 사용하면 고유 한 이미지 데이터 세트에서 지원되는 4 가지 딥 러닝 알고리즘 (SqueezeNet, ResNet, InceptionV3 및 DenseNet) 중 하나를 학습하여 고유 한 사용자 지정 모델을 생성 할 수 있습니다. 이미지 데이터 세트에는 2 가지 이상의 다른 클래스 / 유형 이미지 (예 : 고양이와 개)가 포함되어야하며 최대 정확도를 달성하려면 각 클래스에 대해 500 개 이상의 이미지를 수집해야합니다.

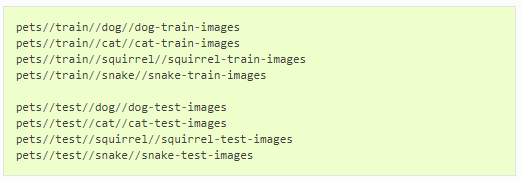
– Create a dataset folder with the name you will like your dataset to be called (e.g pets)

—In the dataset folder, create a folder by the name train

– In the dataset folder, create a folder by the name test

—In the train folder, create a folder for each object you want to the model to predict and give the folder a name that corresponds to the respective object name (e.g dog, cat, squirrel, snake)

– In the test folder, create a folder for each object you want to the model to predict and give the folder a name that corresponds to the respective object name (e.g dog, cat, squirrel, snake)

—In each folder present in the train folder, put the images of each object in its respective folder. This images are the ones to be used to train the model

– To produce a model that can perform well in practical applications, I recommend you about 500 or more images per object. 1000 images per object is just great

—In each folder present in the test folder, put about 100 to 200 images of each object in its respective folder. These images are the ones to be used to test the model as it trains

Data 세트가 준비됨녀 ModelTraining Class의 인스턴스를 생성 할 수 있습니다.

from imageai.Prediction.Custom import ModelTraining

model_trainer = ModelTraining()
model_trainer.setModelTypeAsResNet()

.setDataDirectory ()

이미지 데이터 세트의 테스트 및 기차 하위 폴더가 포함 된 폴더의 경로 여야하는 문자열을 허용합니다

prediction.setDataDirectory(r"C:/Users/Moses/Documents/Moses/AI/Custom Datasets/pets")

.trainModel ()

훈련 과정을 시작하는 함수입니다. 시작되면 dataset / json 폴더 (예 : pets / json)에 JSON 파일을 만들어 데이터 세트 클래스의 매핑을 포함합니다. JSON 파일은 사용자 정의 예측 중에 결과를 생성하는 데 사용됩니다.

model_trainer.trainModel(num_objects=4, num_experiments=100, enhance_data=True, batch_size=32, show_network_summary=True)

– 매개 변수 num_objects (필수) : 이미지 데이터 세트의 여러 클래스 수를 나타냅니다.

—parameter num_experiments (필수) : 알고리즘이 이미지 데이터 세트에 대해 훈련되는 횟수입니다. 훈련 횟수는 훈련 횟수가 증가함에 따라 증가합니다. 그러나 일정 횟수의 교육을받은 후에는 최고 수준이며 데이터 포인트의 크기와 특성에 따라 다릅니다.

– parameter enhance_data (선택 사항) :이 매개 변수는 훈련을 위해 더 많은 샘플을 생성하기 위해 이미지 데이터 세트를 변환하는 데 사용됩니다. 기본적으로 False로 설정되어 있습니다. 그러나 이미지 데이터 세트에 클래스 당 1000 개 미만의 이미지가 포함되어 있으면 True로 설정하는 것이 좋습니다.

—parameter batch_size (선택 사항) : 학습 중에 알고리즘이 일련의 이미지에 대해 병렬로 학습됩니다. 이로 인해 기본값은 32로 설정됩니다. 훈련에 사용중인 시스템의 용량을 충분히 알고 있으면이 값을 늘리거나 줄일 수 있습니다. 이 값을 모으려면 훈련 과정을 최적화하기 위해 값을 8의 배수로 설정해야합니다.

– 매개 변수 show_network_summary (선택 사항) :이 매개 변수는 True로 설정되면 학습을 시작하기 전에 CLI에서 이미지 데이터 세트에 대해 학습중인 알고리즘의 구조를 표시합니다. 기본적으로 False로 설정되어 있습니다.


Sample Code for Custom Model Training

from imageai.Prediction.Custom import ModelTraining

model_trainer = ModelTraining()
model_trainer.setModelTypeAsResNet()
model_trainer.setDataDirectory(r"C:/Users/Moses/Documents/Moses/AI/Custom Datasets/pets")
model_trainer.trainModel(num_objects=10, num_experiments=100, enhance_data=True, batch_size=32, show_network_summary=True)

ImageAI는 매우 강력하지만 사용하기 쉬운 클래스와 함수를 제공하여 이미지 객체 감지 및 추출을 수행합니다.

ImageAI를 사용하면 RetinaNet, YOLOv3 및 TinyYOLOv3와 같은 최첨단 딥 러닝 알고리즘으로 이러한 모든 작업을 수행 할 수 있습니다. ImageAI를 사용하면 감지 작업을 실행하고 이미지를 분석 할 수 있습니다.


======= imageai.Detection.ObjectDetection =======
이 ObjectDetection 클래스는 COCO 데이터 세트에 대해 훈련 된 사전 훈련 된 모델을 사용하여 모든 이미지 또는 이미지 세트에서 객체 감지를 수행하는 기능을 제공합니다. 지원되는 모델은 RetinaNet, YOLOv3 및 TinyYOLOv3입니다. 즉, 일상 생활에서 80 가지 종류의 일상적인 물체를 감지하고 인식 할 수 있습니다. 

사전 훈련 된 모델

https://github.com/OlafenwaMoses/ImageAI/releases/tag/1.0/


OlafenwaMoses/ImageAI

A python library built to empower developers to build applications and systems with self-contained Computer Vision capabilities - OlafenwaMoses/ImageAI

github.com

Download RetinaNet Model - resnet50_coco_best_v2.0.1.h5

Download YOLOv3 Model - yolo.h5

Download TinyYOLOv3 Model - yolo-tiny.h5


Sample Image Object Detection code

from imageai.Detection import ObjectDetection
import os

execution_path = os.getcwd()

detector = ObjectDetection()
detector.setModelTypeAsYOLOv3()
detector.setModelPath( os.path.join(execution_path , "yolo.h5"))
detector.loadModel()
detections = detector.detectObjectsFromImage(input_image=os.path.join(execution_path , "image.jpg"), output_image_path=os.path.join(execution_path , "imagenew.jpg"), minimum_percentage_probability=30)

for eachObject in detections:
    print(eachObject["name"] , " : ", eachObject["percentage_probability"], " : ", eachObject["box_points"] )
    print("--------------------------------")


Sample Video Object Detection code

from imageai.Detection import VideoObjectDetection
import os
import cv2

execution_path = os.getcwd()

camera = cv2.VideoCapture(0)

detector = VideoObjectDetection()
detector.setModelTypeAsYOLOv3()
detector.setModelPath(os.path.join(execution_path , "yolo.h5"))
detector.loadModel()

video_path = detector.detectObjectsFromVideo(camera_input=camera,
    output_file_path=os.path.join(execution_path, "camera_detected_video")
    , frames_per_second=20, log_progress=True, minimum_percentage_probability=30)

print(video_path)


prediction.loadModel(0

Prediction Classes

ImageAI는 매우 강력하지만 사용하기 쉬운 클래스를 제공하여 이미지 인식 작업을 수행합니다. 5 줄에서 12 줄 사이의 python 코드를 사용하여 이러한 최첨단 컴퓨터 비전 작업을 모두 수행 할 수 있습니다. 컴퓨터 시스템에 Python, 기타 종속성 및 ImageAI가 설치되면 만들 수있는 놀라운 응용 프로그램에 제한이 없습니다.


ImagePrediction 클래스는 ImageNet-1000 데이터 세트에서 사전 훈련된 SqueezeNet, ResNet, InceptionV3 및 DenseNet과 같은 최첨단 이미지 인식 모델을 사용하는 기능을 제공합니다. 모든 이미지 또는 여러 이미지에서 1000 개의 서로 다른 물체를 인식합니다


.setModelTypeAsSqueezeNet ()

생성 한 이미지 인식 인스턴스의 모델 유형을 SqueezeNet 모델로 설정합니다. 

prediction.setModelTypeAsSqueezeNet()

.setModelTypeAsResNet ()

생성 한 이미지 인식 인스턴스의 모델 유형을 ResNet 모델로 설정합니다. 

prediction.setModelTypeAsResNet()

.setModelTypeAsInceptionV3 ()

생성 한 이미지 인식 인스턴스의 모델 유형을 InecptionV3 모델로 설정합니다

prediction.setModelTypeAsInceptionV3()

.setModelTypeAsDenseNet ()

생성 한 이미지 인식 인스턴스의 모델 유형을 DenseNet 모델로 설정합니다

prediction.setModelTypeAsDenseNet()

.setModelPath()

다운로드 한 모델 파일의 경로 여야하며 이미지 예측 인스턴스에 설정 한 모델 유형과 일치해야하는 문자열을 허용합니다.

prediction.setModelPath("resnet50_weights_tf_dim_ordering_tf_kernels.h5")

예> 학습한 모델의 경로 : resnet50_weights_tf_dim_ordering_tf_kernels.h5


.loadModel ()

이 함수는 함수 호출에서 지정한 경로에서 모델을 이미지 예측 인스턴스로로드합니다.

prediction.loadModel()

– parameter prediction_speed (선택 사항) :이 매개 변수를 사용하면 이미지에서 예측하는 데 걸리는 시간을 최대 80 %까지 줄일 수있어 정확도가 약간 떨어집니다. 이 매개 변수는 문자열 값을 승인합니다. 사용 가능한 값은 "normal", "fast", "faster"및 "fastest"입니다. 기본값은“normal”입니다.


.predictImage ()

이미지의 실제 예측을 수행하는 함수입니다. 모델이 예측 인스턴스에로드 된 후 여러 이미지에서 여러 번 호출 될 수 있습니다.

predictions, probabilities = prediction.predictImage("image1.jpg", result_count=10)


Sample Codes

#One Image

from imageai.Prediction import ImagePrediction
import os

execution_path = os.getcwd()

prediction = ImagePrediction()
prediction.setModelTypeAsResNet()
prediction.setModelPath(os.path.join(execution_path, "resnet50_weights_tf_dim_ordering_tf_kernels.h5"))
prediction.loadModel()

predictions, probabilities = prediction.predictImage(os.path.join(execution_path, "image1.jpg"), result_count=10)
for eachPrediction, eachProbability in zip(predictions, probabilities):
    print(eachPrediction , " : " , eachProbability)


#Multiple Images

from imageai.Prediction import ImagePrediction
import os

execution_path = os.getcwd()

multiple_prediction = ImagePrediction()
multiple_prediction.setModelTypeAsResNet()
multiple_prediction.setModelPath(os.path.join(execution_path, "resnet50_weights_tf_dim_ordering_tf_kernels.h5"))
multiple_prediction.loadModel()

all_images_array = []

all_files = os.listdir(execution_path)
for each_file in all_files:
    if(each_file.endswith(".jpg") or each_file.endswith(".png")):
        all_images_array.append(each_file)

results_array = multiple_prediction.predictMultipleImages(all_images_array, result_count_per_image=5)

for each_result in results_array:
    predictions, percentage_probabilities = each_result["predictions"], each_result["percentage_probabilities"]
    for index in range(len(predictions)):
        print(predictions[index] , " : " , percentage_probabilities[index])
    print("-----------------------")

https://imageai.readthedocs.io/en/latest/index.html


Official English Documentation for ImageAI! — ImageAI 2.1.5 documentation

Official English Documentation for ImageAI! ImageAI is a python library built to empower developers, reseachers and students to build applications and systems with self-contained Deep Learning and Computer Vision capabilities using simple and few lines of

imageai.readthedocs.io

ImageAI는 개발자, 교육자 및 학생이 간단한 코드 몇 줄을 사용하여 자체 포함 된 딥 러닝 및 컴퓨터 비전 기능을 갖춘 응용 프로그램 및 시스템을 구축 할 수 있도록 개발 된 Python 라이브러리입니다.

ImageAI는 DeepQuest AI 팀인 Moses Olafenwa와 John Olafenwa가 개발 한 프로젝트입니다.


https://github.com/OlafenwaMoses/ImageAI


OlafenwaMoses/ImageAI

A python library built to empower developers to build applications and systems with self-contained Computer Vision capabilities - OlafenwaMoses/ImageAI

github.com

Installing ImageAI

ImageAI를 사용하려면 Python 3.5.1 이상과 다른 Python 라이브러리 및 프레임 워크가 설치되어 있어야합니다.

Python 3.5.1 or higher

Tensorflow 1.4.0 or higher

#Tensorflow
pip install --upgrade tensorflow

#OpenCV
pip install opencv-python

#Keras
pip install keras

#ImageAI
pip install imageai --upgrade


Video Object Detection


Image Object Detection

아나콘다를 설치하면

기본적으로 Python 3.7.7(현재의최신) 위에 Tenorflow 2.0.0 환경이 구축된다


하지만 예전에 작성된 코드나 책의 예제 코드를 구동할때 에러가 발생

Tensorflow 2.0.0에서는 syntax가 많이 변경되었기 때문에 Tensorflwo 1.# 환경에서 작성된 코드를 

바로 사용할수 없다.


그래서  Python 3.7.7 위에 Tensorflow 1.14.0 의 환경이 필요한다

conda create --name py37tf14 python=3.7

Python3.7 환경에 py37tf14란 이름으로 가상환경 만듦

conda activate py37tf14
pip install --upgrade tensorflow==1.14.0

py37tf14 환경에 Tensorflow1.14.0 버전 설치

'AI' 카테고리의 다른 글

ImageAI - ④Custom Training : Prediction  (0) 2020.06.09
ImageAI - ③Detection Classes  (0) 2020.06.09
ImageAI - ②Prediction Classes  (0) 2020.06.09
ImageAI - ①소개, Installing ImageAI  (0) 2020.06.09

파이썬 아나콘다 설치

아나콘다 

수학, 과학 분야의 패키지로 튜닝한 파이썬으로 수학, 과학분야에 필요한 거의 모든 패키지들

(Numpy, SciPy, IPython, Matplotlib 등)이 포함되어 있다.

정식 파이썬을 설치한 후 일일이 필요한 라이브러리를 추가로 설치하는 것은 의존성 문제나

설치의 번거로움 등으로 짜증날 수 있기 때문에 용량은 조금 더 크지만 아나콘다를 설치하는 것이

좋다.


아나콘다의 설치


하기의 링크를 통해 자신에 맞는 OS환경의 아나콘다 Installer를 다운로드 한다.

https://www.anaconda.com/products/individual


Individual Edition | Anaconda

🐍 Open Source Anaconda Individual Edition is the world’s most popular Python distribution platform with over 20 million users worldwide. You can trust in our long-term commitment to supporting the Anaconda open-source ecosystem, the platform of choice

www.anaconda.com

설치과정

설치가 되면 기본적으로 Python3.7.7 버전으로 설치가 된다.

여러가지 예제를 다루다 보면 Python버전을 변경해야 될 경우 발생한다.

예를 들어 Python3.6으로 변경하여 보자


아나콘다에서 파이썬 버전 변경


명령프롬프트에서

사용가능한 파이썬 버전 확인

conda search python

버전을 변경하는 방법으로 기존버전을 유지한 채로 Python3.6.9 환경을 더 만드는 방법을 추천한다.

py36라는 이름으로 python 3.6.9 환경을 만든다.

conda creat -n py36 python=3.6.9 anaconda

윈도우 키를 눌러 Anaconda에 python36이 설치된것을 확인 할 수 있다

COCO Dataset에서 Data다운로드

YOLOv3 모델같은 경우는 coco dataset기준으로 학습이 되어 있으므로, 80개의 사물을 Detection할수 있다

https://pjreddie.com/darknet/yolo/

mAP : 평균정밀도 평균(Mean Average Precision)

Bn : 십억(Billion), 백만(Million)

cfg : 신경망 구성정보

Weights : 신경망 가중값


YOLOv3 DataSet중에서 mAP, Bn, cfg의 정보를 참조해서 다운받을 weights를 선택한다.


#tiny yolov3 pretrained weights 다운로드
!wget Pjreddie.com/media/files/yolov3.weights

YOLOv3-tiny.cfg파일 다운로드

!wget https://github.com/pjreddie/darknet/tree/master/cfg/yolov3-tiny.cfg


YOLOv3 Detection test


1 .Githud 접속하여 project 다운로드

https://github.com/zzh8829/yolov3-tf2


zzh8829/yolov3-tf2

YoloV3 Implemented in Tensorflow 2.0. Contribute to zzh8829/yolov3-tf2 development by creating an account on GitHub.

github.com

2 . 다운로드 받은 yolov3-tf2-master.zip 압축을 푼다

3.  yolov3-tiny.weights 파일을 Data폴더에 추가


4. 윈도우키 + R을 누르고 cmd 실행하여 프롬프트 창 이동


5. 압축을 해제한 경로로 이동

cd C:\Users\woo\Downloads\yolov3-tf2-master


6. 가충치 파일을 Keras에서 사용가능한 파일로 변경

python convert.py

7. webcam을 실행하여 YOLOv3로 Detection가능한 80개의 사물을 test

python dectect_video.py --video 0


'AI > YOLOv3' 카테고리의 다른 글

Yolov3 Object Detection  (0) 2020.06.03

YOLO(You Only Look Once) 최첨단 기술이다, 실시간 개체 검출 시스템. 

YOLO(You Only Look Once)는 이미지 내의 bounding box와 class probability를 single regression problem으로 간주하여, 이미지를 한 번 보는 것으로 object의 종류와 위치를 추측한다.

YOLOv3는 매우 빠르고 정확하다. 0.5 교차겹침결합(IOU: Intersection Over Union)으로 측정한 mAP 에서 욜로v3는 초점손실은 동등하다 하지만 약 4배 빠르다. 게다가, 모형의 크기를 변경하는것 만으로 속도와 정확성간의 균형을 쉽게 이룰수 있다, 

YOLO가 보여주는 상대적인 장점과 단점 

장점:

  • 간단한 처리과정으로 속도가 매우 빠르다. 또한 기존의 다른 real-time detection system들과 비교할 때,2배 정도 높은 mAP를 보인다.
  • Image 전체를 한 번에 바라보는 방식으로 class에 대한 맥락적 이해도가 높다. 이로인해 낮은 backgound error(False-Positive)를 보인다.
  • Object에 대한 좀 더 일반화된 특징을 학습한다. 가령 natural image로 학습하고 이를 artwork에 테스트 했을때, 다른 Detection System들에 비해 훨씬 높은 성능을 보여준다.

단점:

  • 상대적으로 낮은 정확도 (특히, 작은 object에 대해)

'AI > YOLOv3' 카테고리의 다른 글

YOLOv3 Detection test  (0) 2020.06.04

+ Recent posts